EZSign
Simple Electronic Signature Capture for Salesforce®
Documentation
Select from the following items to learn more about EZSign and how to customize it to suit your needs:
- For Existing EZSign Customers Migrating from "Classic" to "Lightning"
- Package Contents
- After Installing the Package
- Adding EZSign to Other Salesforce Objects
- Embedding EZSign Into a Visualforce Page
- Adding the Signature to an Email Template
- Overriding EZSign Text with Local Translations
- Using "onClickFunction" Before Signature Capture
- Using "saveFunction" After Signature Capture
- Using "redirectURL" to Redirect After Signature Capture
- Capturing Multiple Signatures
- Collecting Signatures Remotely Via Email
- Remote Signature Capture Configuration
For Existing EZSign Customers Migrating from "Classic" to "Lightning"
If you're an existing customer wanting to migrate your EZSign app from Classic to Lightning, please follow these simple steps:
- Visit the EZSign listing on the AppExchange and upgrade to the latest version of the app. This version is backward compatible and so it won't affect any of your existing functionality.
-
Edit any existing custom buttons you may have created by changing the Content Source from "OnClick JavaScript" to "URL" and changing the formula from this:
window.location='/apex/EZSign__getSignature?id={!YourObjectName__c.Id}';
to this:/apex/EZSign__getSignature?id={!YourObjectName__c.Id}
-
Add all of your buttons to the "Mobile & Lightning Actions" section of your page layouts so that they'll be available in Lightning and Salesforce Mobile.

That's it, you're done! If you run into any problems or need assistance, please Contact Us so we can help get you migrated.
Package Contents
The EZSign package contains the following Salesforce elements:
| 4 Visualforce Components | getSignature, createSignature, clearSignature, & documentViewer |
| 6 Custom Fields | Signature__c, Signature_Name__c, Signature_Date__c, Signature_URL__c, Signature_Image__c, Signature_Key__c |
| 19 Custom Labels | chatterSignatureCaptured, chatterSignatureCleared, chatterSignatureRequested, clearLabel, clearSignatureConfirmation, drawActionLabel, drawLinkLabel, drawnSignatureRequiredLabel, emailBody, emailGreeting, emailLink, emailSignOff, emailSubject, nameRequiredLabel, remoteSignatureConfirmation, submitButtonLabel, typeActionLabel, typeInstructions, & typeLinkLabel |
| 3 Custom Buttons | Get Signature, Clear Signature, & Get Signature Remotely* |
| 3 Custom Action Buttons† | Get Signature, Clear Signature, & Get Signature Remotely* |
| 3 Apex Classes | documentViewer, EZSign, & EZSign__Test |
| 1 Apex Trigger | mapToParent |
| 7 Visualforce Pages | clearSignature, createSignature*, getSignature, getSignatureEmailBody*, getSignatureEmailSubject*, getSignatureRemotely*, & showSignature |
| 1 Custom Object | Signature* |
| 2 Custom Settings | EZSign Email Settings* & EZSign Settings* |
| 1 Static Resource | EZSign |
| 2 Sample Email Templates | EZSign & EZSign Custom (found under "EZSign Email Templates") |
†Only required for capturing signatures with the Salesforce Mobile app
After Installing the Package
Once you've downloaded and installed the EZSign package, modify the Contact page layout to include the following elements:
Fields:- Signature (the signature image once a signature has been captured)
- Signature Name (the typed in name for the signature)
- Signature Date (the timestamp of when the signature was captured)
- Clear Signature (used to clear an existing signature)
- Get Signature (used to get a new signature when logged into Salesforce)
- Get Signature Remotely (used to get a new signature remotely via email)
- Clear Signature (used to clear an existing signature)
- Get Signature (used to get a new signature when logged into Salesforce)
- Get Signature Remotely (used to get a new signature remotely via email)
Adding EZSign to Other Salesforce Objects
To use EZSign with other standard or custom objects in Salesforce, follow these steps:
Step 1:
Add the following Custom Fields to your standard or custom object. Note the fields in blue as their Field Labels do not match their Field Names.
-
Data Type: Text
Field Label: Signature Name
Length: 255
Field Name: Signature_Name (will produce a "Signature_Name__c" API Name)
Add to Page Layout: Yes
-
Data Type: Date/Time
Field Label: Signature Date
Field Name: Signature_Date (will produce a "Signature_Date__c" API Name)
Add to Page Layout: Yes
-
Data Type: Text Area (Long)
Field Label: Stored Signature
Length: 32,768
# Visible Lines: 3
Field Name: Signature (will produce a "Signature__c" API Name)
Add to Page Layout: No
-
Data Type: Text
Field Label: Signature URL
Length: 255
Field Name: Signature_URL (will produce a "Signature_URL__c" API Name)
Add to Page Layout: No
-
Data Type: Formula
Field Label: Signature
Field Name: Signature_Image (will produce a "Signature_Image__c" API Name)
Formula Return Type: Text
Formula: IF(NOT(ISBLANK(Signature_URL__c )),IMAGE(Signature_URL__c ,'Signature'),'')
Add to Page Layout: Yes
-
Data Type: Text
Field Label: Signature Key
Length: 255
Field Name: Signature_Key (will produce a "Signature_Key__c" API Name)
Add to Page Layout: No
-
Data Type: Text
Field Label: Signature Initials
Length: 255
Field Name: Signature_Initials (will produce a "Signature_Initials__c" API Name)
Add to Page Layout: Yes
Step 2:
Create the following Custom Buttons for the standard or custom object:
-
Label: Get Signature
Name: Get_Signature
Display Type: Detail Page Button
Behavior: Display in existing window with sidebar
Content Source: URL
Function:
/apex/EZSign__getSignature?id={!YourObjectName__c.Id}
-
Label: Clear Signature
Name: Clear_Signature
Display Type: Detail Page Button
Behavior: Display in existing window with sidebar
Content Source: URL
Function:
/apex/EZSign__clearSignature?id={!YourObjectName__c.Id}
-
Label: Get Signature Remotely *
Name: Get_Signature_Remotely
Display Type: Detail Page Button
Behavior: Display in existing window with sidebar
Content Source: URL
Function:
/apex/EZSign__createSignature?id={!YourObjectName__c.Id}
*Only required for capturing signatures remotely via email
Step 3:
Edit the Page Layout for your standard or custom object record to include the new custom buttons along with the "Signature Name," "Signature Date," and "Signature" fields.
Embedding EZSign Into a Visualforce Page
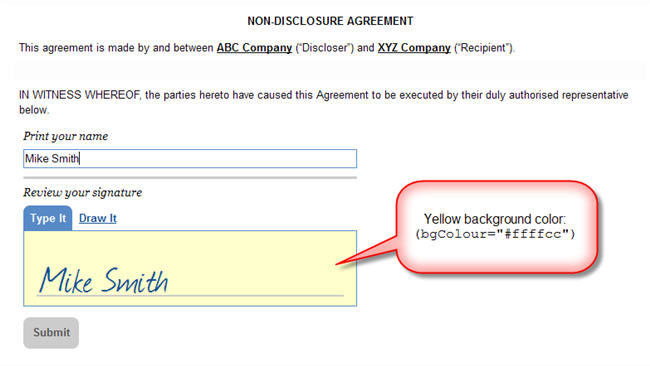
The EZSign signature box can be embedded into any Visualforce page with just a single line of code! The following is an example of how to do this:
                                <apex:page standardController="Contact">
                                    <center><b>NON-DISCLOSURE AGREEMENT</b></center>
                                    <p>This agreement is made by and between...</p>
                                    <p>IN WITNESS WHEREOF, the parties hereto have caused this Agreement to be
                                        executed by their duly authorized representative below.</p>

                                    <EZSign:getSignature bgColour="#ffffcc" />

                                </apex:page>
This is what the code above produces:
There's no limit to the number of objects or instances of EZSign within your Salesforce org but don't forget to modify your page layout(s) to accommodate all of them.
Adding the Signature to an Email Template
NOTE: In order to use this feature, you will need to set the "createExternalImage" attribute to TRUE so that externally available image Documents will be created whenever a signature is submitted (e.g., createExternalImage="TRUE").
Once a signature has been captured, it can then be added to a custom email template if you wish to send the customer a copy of the signature as part of a receipt or forward it on to other Salesforce users.
There are two sample email templates included with the EZSign package that you can use as a reference, one "Custom" and the other "Visualforce." These samples are found under the "EZSign Email Templates" folder of Email Communication Templates.
For "Custom" (as well as "HTML") templates, the common fields are:
Recipient: {!Contact or YourObjectName__c.Name}
Signature: {!SUBSTITUTE(Contact or YourObjectName__c.Signature_Image__c,'amp;','')}
Printed Name: {!Contact or YourObjectName__c.Signature_Name__c}
Signature Date: {!Contact or YourObjectName__c.Signature_Date__c}
For "Visualforce" email templates, the common fields are:*
Recipient: {!recipient.EZSign__Name}
Signature: <img src="{!recipient.EZSign__Signature_URL__c}" />
Printed Name: {!recipient.EZSign__Signature_Name__c}
Signature Date: {!recipient.EZSign__Signature_Date__c}
*include the highlighted "EZSign__" namespace if using the default "Contact" object.
Overriding EZSign Text with Local Translations
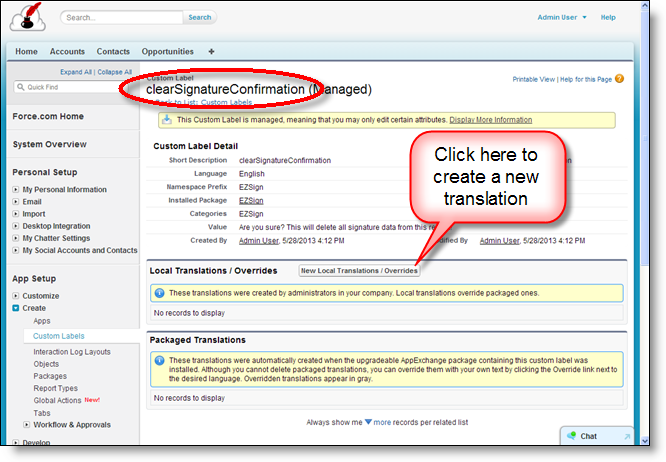
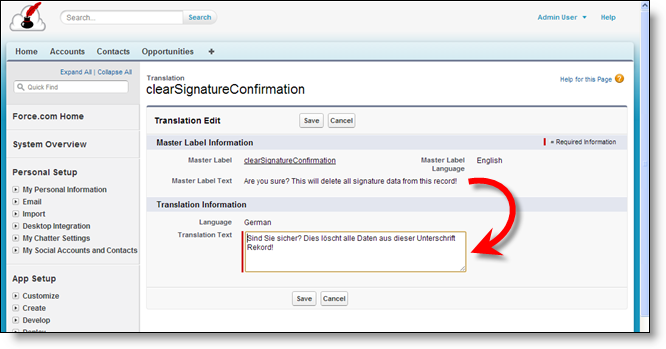
Using the Salesforce Translation Workbench all EZSign text can be overridden by creating local translations for our custom labels. Please note that all text within the PDF document viewer is controlled by your browser language settings and that language translation is not available for Salesforce users on Group edition where custom labels are not supported. Below are some screenshots demonstrating how this works:
Creating a local translation for a custom label:
Editing the text for a local translation:
To set up your Salesforce org so that you'll be able to create local translations, please visit the help page for the Salesforce Translation Workbench.
Using "onClickFunction" Before Signature Capture
Before a signature has been submitted, you can use the "onClickFunction" attribute to call a JavaScript function to do things like validate other fields on the page before the signature is actually captured.
                                <apex:page standardController="Account">
                                     <script>
                                          function validateFields(){
                                              if(1+1==2){
                                                  submitSig();
                                              } else {
                                                  alert('Please check all boxes');
                                              }
                                          }
                                     </script>
                                     <EZSign:getSignature onClickFunction="validateFields()" />
                                </apex:page>
Using "saveFunction" After Signature Capture
Once a signature has been submitted, you can use the "saveFunction" attribute to call a JavaScript function to redirect the user to another Visualforce page or website, along with any URL parameter data.
                                <apex:page standardController="Account">
                                     <script>
                                          function redirectURL(){
                                              window.open("/apex/ThankYou?Accountid={!$CurrentPage.parameters.AccountId}&
                                              Caseid={!$CurrentPage.parameters.CaseId}");
                                          }
                                     </script>
                                     <EZSign:getSignature saveFunction="redirectURL()" />
                                </apex:page>
Using "redirectURL" to Redirect After Signature Capture
After a signature has been captured, you can use the "redirectURL" attribute to redirect the user to another Visualforce Page or another website, including URL parameters.
                                <apex:page standardController="Account">
                                     <EZSign:getSignature redirectURL="http://www.someotherwebsite.com?customer={!Account.Id}" />
                                </apex:page>
Capturing Multiple Signatures
You can use EZSign to capture any number of signatures per record, as long as you've created the necessary fields to store the data. To do so, simply follow the instructions above for creating the EZSign fields but include a "name" or "number" in the API name of each field.
For example, the standard "Signature__c" field would become "Signature2__c" where "2" is the name of the second set of fields. NOTE: The first signature always needs to use the standard EZSign API names referenced above but the Labels can be whatever you want them to be (e.g., Applicant Name & CoApplicant Name --> Signature__c & Signature Co-Applicant__c).
Technique #1: Capturing Multiple Signatures In Sequence
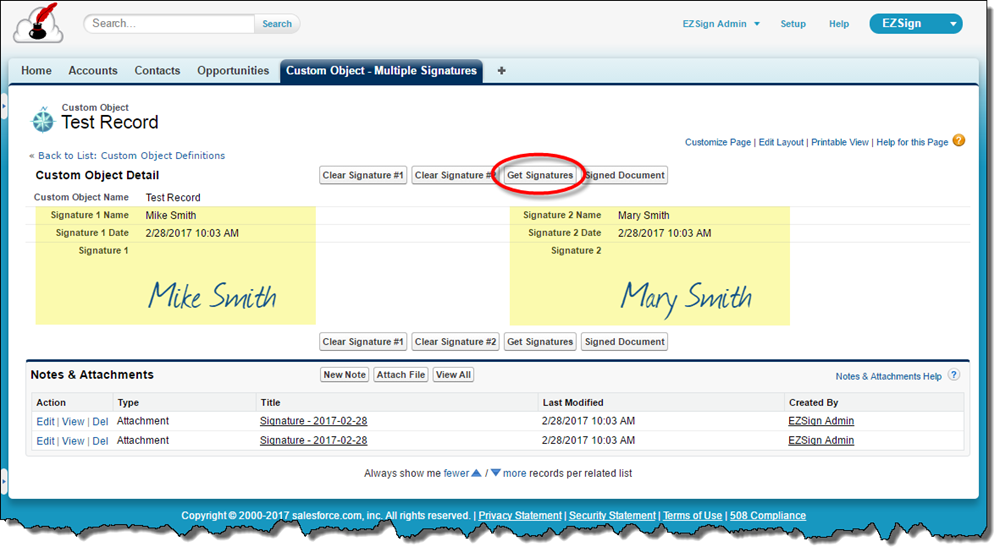
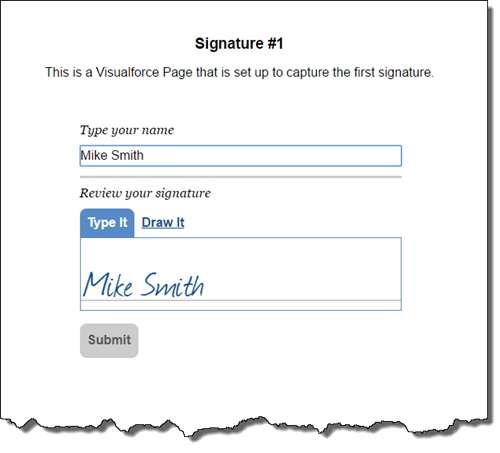
If you'd like to capture one signature at a time, you can use the "saveFunction" attribute described above to capture multiple signatures in sequence, similar to what appears on the EZSign Test Drive site. Here, a single "Get Signatures" button appears at the top of the record. When the button is clicked, the "Signature #1" page is displayed and then redirects to "Signature #2" once the first signature has been captured.
The following is the Visualforce code for the "Signature #1" and "Signature #2" pages above. When the user enters their signature and hits the "Submit" button, they are then redirected to the "Signature #2" page so the second signature can be captured.
                                <apex:page title="Signature #1" standardController="Custom_Object__c">
                                     <script>
                                          function getSignature2(){
                                               window.location='/apex/Signature2?id={!Custom_Object__c.Id}';
                                          }
                                     </script>
                                     <center>
                                          <b style="font-size: 14pt;">Signature #1</b><br />
                                          <p>This is a Visualforce Page that is set up to capture the first signature.</p>
                                     </center>
                                     <EZSign:getSignature saveFunction="getSignature2()" />
                                </apex:page>
                                <apex:page title="Signature #2" standardController="Custom_Object__c">

                                <center>
                                    <div style="width:600px;">
                                        <center>
                                            <br /><br /><b style="font-size: 14pt;">Signature #2</b><br />
                                            <p>This is another Visualforce Page that is set up to capture the second signature.</p>
                                        </center>

                                        <div style="font-size:10px; text-align:left; margin:auto; width:400px;">
                                            <apex:outputField value="{!Custom_Object__c.Signature_Image__c}" /><br />

                                            <EZSign:getSignature sigName="2" />
                                        </div>
                                    </div>
                                </center>

                                </apex:page>
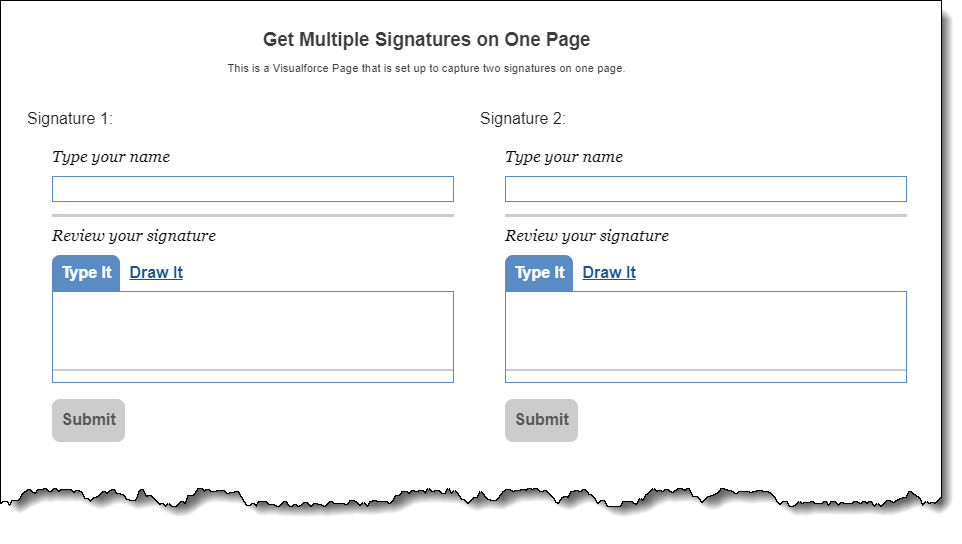
Technique #2: Capturing Multiple Signatures On One Page
If you'd prefer to capture multiple signatures on one page, just <iframe> them together like so:
The following are the three Visualforce Pages that are used in the screenshot above:
Main Visualforce Page:
                                <apex:page showHeader="false" standardController="Custom_Object__c">

                                <center>
                                    <br /><br /><b style="font-size: 14pt;">Get Multiple Signatures on One Page</b><br />
                                    <p>This is a Visualforce Page that is set up to capture two signatures on one page.</p><br /><br />
                                </center>

                                <div style="width:1000px; margin:auto; padding-left:200px;">
                                    <iframe src="/apex/MultiSig1?id={!Custom_Object__c.Id}" height="400" width="450" style="border:none;" />
                                    <iframe src="/apex/Multisig2?id={!Custom_Object__c.Id}&sigName=2" height="400" width="450"
                                        style="border:none;" />
                                </div>

                                </apex:page>
"MultiSig1" Visualforce Page:
                                <apex:page standardController="Custom_Object__c">
                                Signature 1:<br /><br />
                                <EZSign:getSignature returnToRecord="false" />
                                </apex:page>
"MultiSig2" Visualforce Page:
                                <apex:page standardController="Custom_Object__c">
                                Signature 2:<br /><br />
                                <EZSign:getSignature sigName="2" returnToRecord="false" />
                                </apex:page>
Once all of the signatures have been captured, you can then have a final document showing all of them in a single PDF file, like this:Here's the Visualforce page that renders the above PDF file: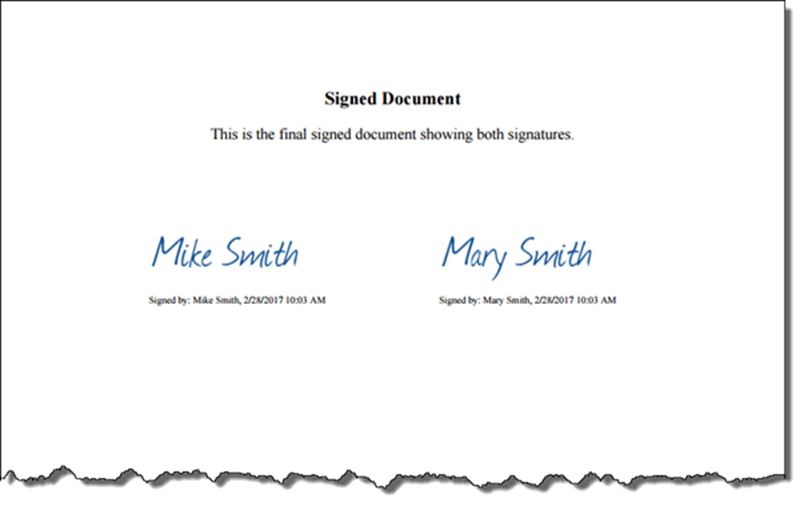
                                <apex:page title="Signed Document" standardController="Custom_Object__c" renderAs="PDF" >
                                <center>
                                     <b style="font-size: 14pt;">Signed Document</b><br />
                                     <p>This is the final signed document showing both signatures.</p>

                                     <div>
                                          <div style="float:left; font-size:10px; text-align:left; width:300px; overflow:hidden;
                                          margin-left:100px;">
                                          <apex:outputField value="{!Custom_Object__c.Signature_Image__c}" /><br />

                                          <div style="float:left; font-size:10px; text-align:left; width:300px;
                                          overflow:hidden;">
                                          <apex:outputField value="{!Custom_Object__c.Signature2_Image__c}" /><br />
                                      </div>
                                </center>
                                </apex:page>
Collecting Signatures Remotely Via Email
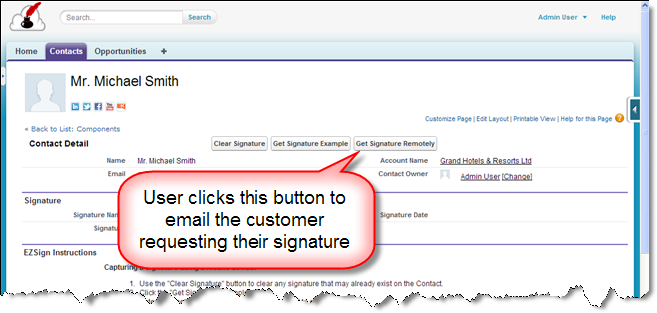
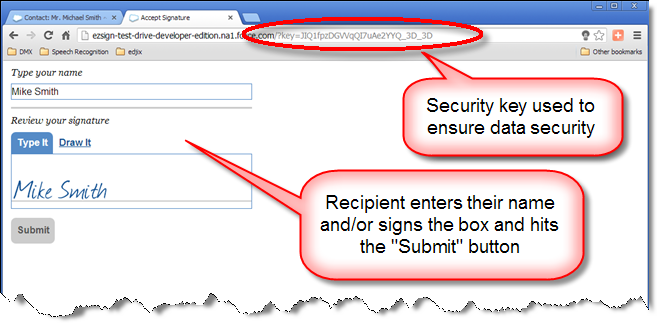
If someone is not able to sign your mobile device in person, you can use EZSign to safely and securely capture their signature remotely via an automated email message. Below are some screenshots demonstrating how this works:
Salesforce Contact record (without signature):
Recipient's email message:
Website where signature is entered:
Salesforce Contact record (with signature):
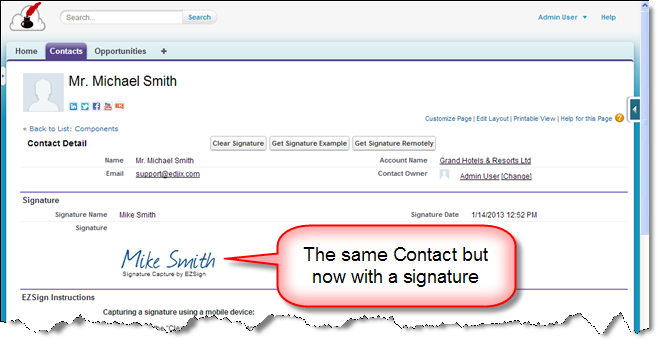
Enabling this process requires the use of a Salesforce "Site" and the purchase of an additional EZSign license so that guest users are able to submit their signatures directly to your Salesforce org.
To ensure data security, EZSign uses a security key that prevents someone from entering or accessing someone else's signature.
Click here to learn more about setting up Salesforce for Remote Signature Capture.

